Introduction
In the first blog in this series, we discussed how to enable the native REST API in DB2 for z/OS. In this edition, we’re going to focus on how we go about creating new services and what methods we used to do this.
In doing so, we’re going to be using PHP – which is an open source, server side scripting language. It’s very widely used (reportedly including Facebook’s first iteration) and is backed by a ton of web based tutorials and help, so if this is your first time, there’s plenty of self-help out there!
Before we get started though, we probably ought to consider:
What Is a REST Service?
In DB2 terms, this can be an SQL statement or a stored procedure. Whilst almost everything is supported, some things (e.g. Accelerator support and DRDA chaining on to other DB2 servers) are not. For the current state, check the information APAR II14827 that we mentioned in the previous blog.
The intention is to provide a service point – whether internally inside your own business, or externally to partners, agents or even the world in general. This point provisioning is – as defined by REST – stateless, i.e. a single shot unit of recovery. So, if you can’t answer the question, or provide the data in a single query, it’s time to brush up on your stored procedure skills.
Remember that this is all being initiated under DDF, so anything that you do using the REST API is going to be viewed as DB2 zIIP eligible work (up to 60% offloadable).
DB2ServiceManager
The REST API comes with a pre-configured service called DB2ServiceManager, which is what we use to deploy – or remove – a service. We’ll run through the process of doing this by creating a fairly trivial example to fetch an employee salary from the DB2 V11 employee sample table (DSN81110.EMP) – the query looks like this:
SELECT SALARY FROM DSN81110.EMP WHERE EMPNO = ?
Ideally, we’d now use Data Studio (4.1.2 or better) to define this, but in testing whilst it worked wonderfully with z/OS Connect, we couldn’t get it to play nicely with the DB2 DDF Native REST API. To overcome this, we’ve used PHP (and the cURL PHP plugin) to issue the required “createService” POST request to register the service.
Using PHP to Create the Service
It looks like this:
The code sections do the following:
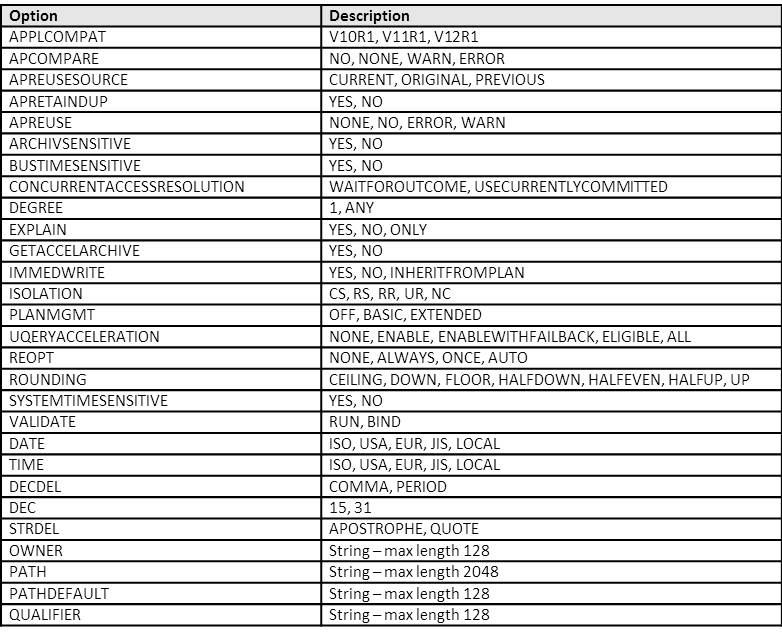
- $url and $postData define the request target (where to send it) and what we want it to do. There are a large number of potential parameters that can be used in the $postData array – see “Request BIND Options”, below. Note that the collectionID is required as this is used in the resulting service URL
- $data is the JSON encoded $postData, which is what we actually POST to REST.
- From $userid through to the end of the $hdrs assignment is all about setting up the userid and password for the request. We’re using base64 encoding, which isn’t really very secure, but this is just an example J
- The rest of the code is about having cURL issue an HTTP POST of the request to $url, and then reporting the results.
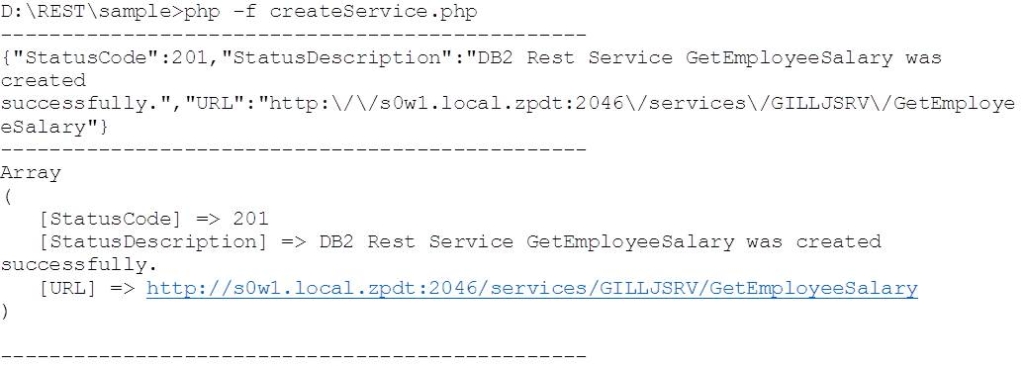
Here’s the response from running the PHP script (createService.php):
Note the returned URL (“[URL]”) of the resulting service. It is made up of the address and port number of our DB2 service, the string “/services/”, then the collection ID and service name.
Request BIND Options
You can see what options are currently supported in your configuration, by pointing your web browser at the service that you want to query. In this case, we want to see what parameters / options are available when calling the DB2ServiceManager – and we can get this by looking at:
https://s0w1.local.zpdt:2046/services/DB2ServiceManager
Here’s a list of the BIND options available at the time of writing:
These all have the standard BIND meanings.
Using PHP to Drop the Service
As well as creating services, you will inevitably need to drop (delete) them as well. This is also supported through the DB2ServiceManager REST service using the “dropService” request:
This produced the following output:
Checking What’s Registered
You can see what services have been registered by pointing your web browser at the base services URL:
https://host:port/services/
If you’ve created the example above, and not deleted it yet, you’ll see something like this response:
Checking the Registration
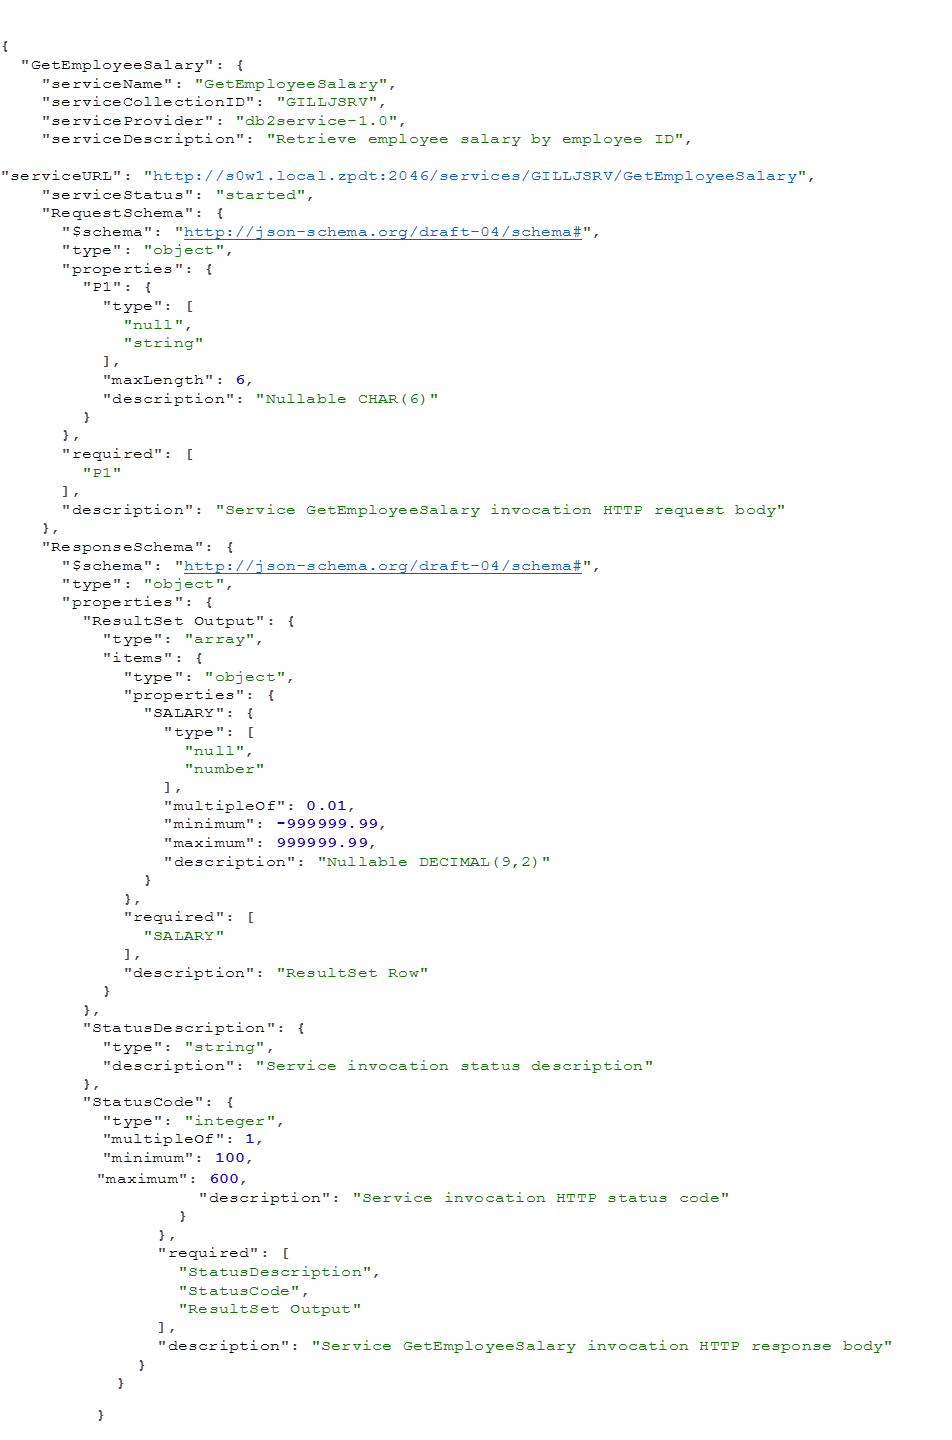
Similarly, we can check the registration and the parameter formats by pointing the web browser at the service URL – e.g.
https://s0w1.local.zpdt:2046/services/GILLJSRV/GetEmployeeSalary
to check the sample service that we created above, yields the following:
Note the sections:
- RequestSchema – inbound parameters
- Parameter P1 is a nullable string, 6 characters long and is required
- ResponseSchema – outbound returned data and status
- ResultSet Output (from the SQL) is:
- Output field SALARY is a nullable decimal (+/-999999.99)
- StatusDescription – REST API supplied
- StatusCode – REST API suppled (100 – 600)
- ResultSet Output (from the SQL) is:
Next
In the next blog, DB2 Native REST API – A Sample REST Application, we’ll look at how we can – and cannot – drive our new REST service.
Access all of James Gill’s Native REST API blogs here.


